You are using an out of date browser. It may not display this or other websites correctly.
You should upgrade or use an alternative browser.
You should upgrade or use an alternative browser.
Long Term rebuild on my New (OLD) Duck
- Thread starter Skeltonsc
- Start date
UmdlotiOnDad
New member
Cool thread. Keep,it up
Howzit guys, slow progress so far.
Been sanding the outboards as there is no rush, I have decided to paint the outboards and deck in 2K white.
I have bought a cheapish Air Sprayer as I dont have a big enough compressor to spray with but I'm certain it will do the Job.
the more I sand the more depressed I get with the rusted bolts, I really want to get the power units off so I can clean and paint properly.
But there is no way I'm gonna get those bolts out without breaking a few off.
Am looking at induction heating coils to get those bolts nice and hot then maybe try loosen them.
I took off the skeg guards to find some serious corrosion down on the skegs. have cleaned them up nicely.
Attachments


I would really like to get the powerheads off so I can remove the cowlings and clean and paint everything properly but looking at these I think thats really not gonna happen.
Both motors have good compression and start and run fine, so I think I will clean and strip off as much as I can.
it just means the end job wont be as good as I want. but the outside will be fine.
I'm still thinking of building a induction heater and getting those bolts red hot.
but we will see how things progress.
https://youtu.be/YJElT9xK3bk
<iframe width="853" height="480" src="https://www.youtube.com/embed/YJElT9xK3bk?ecver=1" frameborder="0" allow="accelerometer; autoplay; encrypted-media; gyroscope; picture-in-picture" allowfullscreen></iframe>
Attachments

Dr halibut hoffman
Moderator
I would just want to built an induction coil because they are so cool! And you can smelt alu and copper and have all sorts of fun and did I mention how cool they are! So cool, I want one! ") Come on build one and show us how you did it.. Then use it to make spoons, whatever!
Come on build one and show us how you did it.. Then use it to make spoons, whatever!
My friend has a digital induction coil that is the best thing I have ever tried for its purpose, ever..hands down. Haha He got it direct from California but it's for a completely different unrelated application.
Come on build one and show us how you did it.. Then use it to make spoons, whatever! My friend has a digital induction coil that is the best thing I have ever tried for its purpose, ever..hands down. Haha He got it direct from California but it's for a completely different unrelated application.
Hello Guys and Girls, hope you all had a good Christmas and New years,
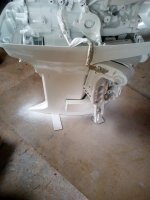
So I spent a little time on the boat, seems that everywhere I scratch the more crap I find that has to be fixed:shock:
Anyways I found that the Glue holding the pontoons on the deck had come undone which is just as well as I found litres and litres of water down there and considering the boat is parked in a garage for the last year this is a little worrisome
Attachments

Lucky I had tons of the 2 part glue from my previous duck.
So after sanding cleaning and drying the whole lot I managed to glue the pontoons and the strips back to the Deck.
I had managed to get a Induction heater in the meantime and losened the bolts, only broke one of them and considering these are almost 40 years old I was impressed I forgot to take pictures but the heat works very well.
I made up new gaskets and got new Stainless steel bolts and remounted the engines to the legs.
I dont have a compressor or proper spray gun so I bought one of those paint sprayers to do the painting. bear in mind I just want the boat to look better and she is not a super model
Im quite impressed with my painting skills they turned out fine with only 1 or 2 runs
So after sanding cleaning and drying the whole lot I managed to glue the pontoons and the strips back to the Deck.
I had managed to get a Induction heater in the meantime and losened the bolts, only broke one of them and considering these are almost 40 years old I was impressed
I forgot to take pictures but the heat works very well.I made up new gaskets and got new Stainless steel bolts and remounted the engines to the legs.
I dont have a compressor or proper spray gun so I bought one of those paint sprayers to do the painting. bear in mind I just want the boat to look better and she is not a super model
Im quite impressed with my painting skills they turned out fine with only 1 or 2 runs
Attachments
I purposely removed the gearboxes when painting as when I take them off to service the waterpumps I don't want to damage the paint.
I have also removed the rear seat and console to sand and paint them.
unfortuanly the front seat has been fiberglassed in so removal is out of the question.
I now need to clean and paint the deck.
I'm hoping to get this boat finished in a month or 3
I will tackle the underside later in the year
I also got the seats back from the upholstery place they look nice and new
Attachments

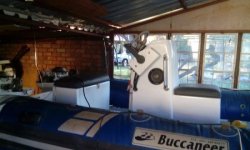
Howzit Guys so made some progress over the weekend, I have fitted the console, and seats they really look nice
Fitted the controls gauges and kill switch
and rewired the engines
the end is nearly in sight.
This weekend I will polish the paint and pontoons to make it all nice and shiny
Fitted the controls gauges and kill switch
and rewired the engines
the end is nearly in sight.
This weekend I will polish the paint and pontoons to make it all nice and shiny
Attachments


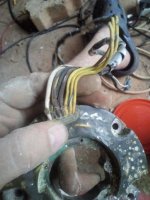
Hello Guys, been a while and I havent really done anything more on the boat however I did find that one of the Outboards no longer charged and was only getting around 6 volts at 4000RPM so being the Cheap scate that I am and being that I have wound many motorcycle stators I have removed the faulty stator from the outboard only to find it encased in epoxy.
Well this shouldn't stop me so I dumped the stator into a tin of Thinners for a few weeks, actually it only took around 3 weeks.
I will get some enameled wire and rewind the stators and pickup coil.
Well this shouldn't stop me so I dumped the stator into a tin of Thinners for a few weeks, actually it only took around 3 weeks.
I will get some enameled wire and rewind the stators and pickup coil.